Sectioning large parts in Insight
Posted on 2020/05/26

SHARE
As Stratasys users well know, we sometimes stumble across parts that are just too big for our build bay. Fear not, as not everything has to be printed in one, so before you outsource to a bureau or completely scrap your idea check out how you can section large parts in Insight.
- Once you have sliced your STL in Insight, you are now ready to section it. Click on the slice tab in the top left-hand corner and scroll down to where it says Section with profile…

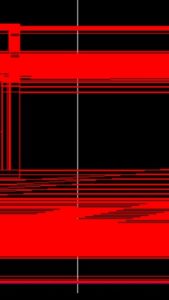
- Clicking this will open up an over-head view of your STL. From here, you can select a section of the part that you want to split. Once you have chosen a spot, just simply click and a line will be created
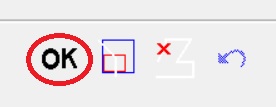
- Once your section is created, go ahead and click the OK tab to the right in your Section with profile menu
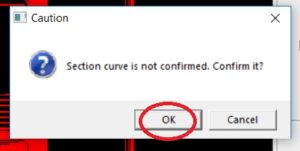
- Your final step is when Insight prompts you to save your Section Curve in which case you need to click OK. A second prompt will then appear asking you to Save before sectioning once again you need to click Yes and your new section will be created and ready to send to your Stratasys printer.
Following the best practices can save you time and supplies and help you complete a build you may not have thought was even possible. For further information or our best tips on Insight software, get in touch with our team.
Book now or just need More Info?
Any questions or book one of our training courses please phone 03332 075660 or email enquiries@3dprintacademy.co.uk