Best practice for removing FDM support materials
Posted on 2019/08/19

SHARE
Stratasys offers a diverse range of FDM model materials that are used in conjunction with two types of FDM support materials. Soluble Release Support (SR) can be washed away in a solution of heated water and a cleaning agent, whilst Breakaway Support Structures (BASS) are manually removed.
Soluble support boasts a hands-free support removal and simply washes away in a detergent bath. With SR you are also able to clean out internal cavities and channels.
SR materials: SR-20, SR-30, SR-35, SR-100, SR-110, QSR, P400-SR
Breakaway support structures is where you remove the support manually. It is much faster for simple structures, which may require the use of hand tools to reach and remove all support material. With BASS there is no need for a removal tank either!
BASS materials: PC-BASS, PPSF-BASS, ULTEM 9085 resin support material, ULTEM 1010 resin support material, SUP 8008B, P400-R
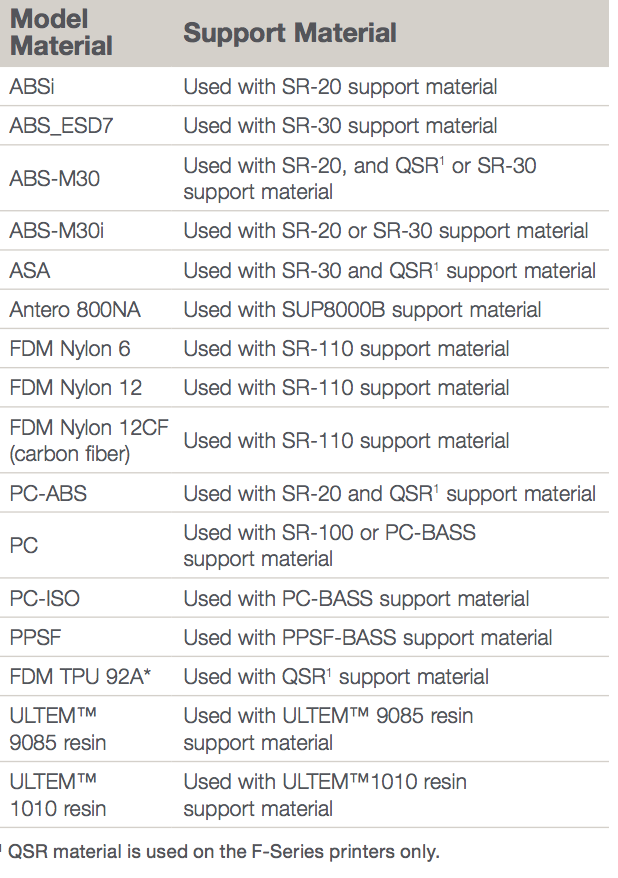
See below a list of the Stratasys FDM materials and what their adjoining support material is:
Important note: We recommend to tank-clean FDM TPU 92A parts for optimal surface finish. Please note though, tank immersion may cause swelling up to 0.5% resulting in the part temporarily being out of dimensional tolerance. Parts will eventually shrink back to size, but it may take up to 72 hours for this to happen depending on size of part and geometry.
BASS removal tips
Breakaway support structures are removed manually, rather than by use of a tank containing a solution of heated-water and a cleaning agent. This method is ideal for parts built using simple support structures. Depending on the part built it may be difficult to reach all support structures in order to break them away, resulting in a greater amount of time spent removing supports. The following tips will help expedite the process of removing BASS.
Warning – please make sure that you always wear safety glasses and safety gloves when removing support material by hand. The support material can be brittle and may cause cuts when manually broken off.
Tools to use….
The use of hand tools can greatly reduce the amount of time spent removing BASS from finished parts (suggested tools shown below). However, care should be taken to ensure that you do not scratch or gouge parts when using tools. For fragile parts, it is always best to take your time in order to eliminate the risk of damaging the part.
Agitation
Agitation aids in support material removal. Stratasys recommends using either a circulation or ultrasonic tank.
Heat
ULTEM™ resins, PPSF and Antero 800NA support materials are much easier to remove if heated. (PC-BASS does not require re-heating as this material is generally easier to remove than ULTEM™ resins and PPSF supports). Placing a finished part into an industrial oven and allowing the part to heat will make support material easier to remove. However, if you decide to heat a part, do not place low temp parts (such as ABS-M30) into a high temp oven (such as 160° C (320° F)). This can damage the part, possibly making it unusable. Please also keep in mind that the more heating/cooling cycles conducted, the more difficult it will be to remove supports. In general, materials should be heated to the temperatures specified in Table 1-3.
WaterWorks best practices
Removing FDM support material incorrectly may affect the physical properties of the model material. Using chemicals that have not been verified to maintain those mechanical properties, immediately and over time, is not recommended. It is always recommended to follow post-processing best practices recommended for that material including time and temperature. This is why both 3D Print Academy and Stratasys recommends WaterWorks. Stratasys have tested the model materials for mechanical properties after soluble support removal using WaterWorks and found no adverse effects if used as recommended.
Important safety guidelines
When using WaterWorks soluble concentrate and a support removal tank observe the following safety guidelines:
- Following the manufacturers documentation on tank operation and safety. Understand how to properly and safely use your chosen wash tank before operation. (Please ask the academy for any advice you need on wash tanks)
- Always wear safety goggles (chemical splash resistant)
- Wear suitable rubber gloves that can withstand the high solution temperature and high alkaline solutions. Here at the academy, we recommend gloves that are cuffed at the elbow. (insert image of gloves here)
- Never place hands in a tank filled with solution and/or hot water
- Always use a proper tool to remove parts from the tank. Plastic or stainless steel removal tools are recommended that can withstand the high solution temperature and high alkaline solution in the tank
- If using a basket, remove the entire basket from the tank before removing part
Removing support material
Some parts have support materials that are hard to remove (e.g., parts with thin, deep channels), resulting in longer dissolving times. To get longer life from your support removal solution it is always best to remove as much support material by hand before you put parts in the tank (except when using SR-100). It takes just a short amount of time to remove excess support material before putting the part in the tank.
Warning – always wear safety glasses and safety gloves when removing support material by hand. The support material can be brittle and may cause cuts when manually broken off.
Be aware of fine or fragile portions of your parts and do not use excess force. Just break off what will come off relatively easily before placing the parts in the support removal tank. While some parts have support material that cannot be removed (e.g., hollow parts with non-accessible interiors). Therefore, it is suggested but not required that you remove some support by hand in order to save tank time and water life span, except when using SR-100.
When using SR-100 it is necessary that you manually remove small amounts of support material prior to placing parts in the tank. This will help eliminate any likelihood of part breakage while in the tank. Thin walled or small feature part geometries (less than or equal to 0.02 in. (0.50 mm)) with encapsulated regions of support may be susceptible to breakage or cracking. This is due to slightly faster thermal expansion of the SR-100 soluble support material compared to the thermal properties of the polycarbonate (PC) model material.
Removing parts from the wash tank
It’s never just as simple as picking out of the wash tank, and your part is ready! Please be careful and wary that you are taking parts out of a chemical tank, that could be harmful to skin. To begin, turn OFF power to the tank. Allow the tank’s cover to drip for a few moments before removing the lid completely. Carefully remove parts from the tank; plastic or stainless steel removal tools (such as tongs) are recommended for removing parts. Removal tools need to be able to withstand high water temperature and high alkaline solution.
Parts must be rinsed after they’re removed from the tank, rinse parts as follows:
- White Parts: Rinse parts thoroughly with water until part surfaces are no longer slippery (1-2 minutes). To reduce the possibility of staining, some white parts may need to soak for an hour to help pull soluble concentrate from part surfaces. Also, soaking parts in a dishwasher rinsing aid and water and then rinsing the parts will break the surface tension
- Colour Parts: Soak parts in water for one hour to dissolve and pull soluble concentrate from part surfaces. Also, soaking parts in a dishwasher rinsing aid and water and then rinsing the parts will break the surface tension.
- Soft Water or Deionized Water: Sparse parts need to be drained and re-rinsed. A vacuum chamber can be used to pull solution out of the part.
Please note: Failing to rinse or soak parts long enough can leave them with a white residue and/or streaks. If this occurs, rinse or soak the parts again to remove the residue. Part surface aesthetics can also be negatively impacted as a result of inadequate tank solution. Check the tank’s solution and change it if necessary. (insert picture of stained part)
For parts built using the sparse build style, allow parts to drain fully as solution can get trapped inside the part. Allow parts to dry thoroughly and then rinse parts (for 1-2 minutes) under hot water, once again making sure that you do not allow any water to get trapped inside the part. Dry parts with paper towels, compressed air, or let them air-dry. If coloured parts turn slightly white after drying, rinse them under hot water or soak them again as previously instructed.
If you would like any further information on the above, please do not hesitate to get in contact with our academy trainers. Alternatively, we cover this briefly in our Level 2 FDM training!
Book now or just need More Info?
Any questions or book one of our training courses please phone 03332 075660 or email enquiries@3dprintacademy.co.uk